Sunday, March 28, 2010


So I wanted to make an ATC, with our lady here.  I found her on an old postcard, and thought she looked very fashionable.  
So, to start with I trimmed the picture down our of the postcard.  I had to trim a little more for her to fit on an ATC, but you can't tell.  The roses were a labor of love.  To start off I stamped both the roses and the butterfly for positioning, then I stamped the butterfly again, in order to make a mask.  I stamped the butterfly on the hymnal paper first, then applied the mask, and then stamped the roses.  I colored everything using colored pencils and mineral spirits.  Now here is where the fun starts.  I stamped the butterfly and rose again, and colored both of them again with the same technique.  I then cut, accented with Perfect Pearls, and glued into place each individual petal, and the butterfly.  While an intensive technique it adds so much dimension.  The spots where there is not a dimensional petal, it is because that is the part of the petal before it opens outward.
Finally I accented the edge of the photo with Antique Linen, and Tattered Rose Distress Stickles.  I accented the top with some lace, and then bead accents.  I finished with the little light catching embellishment, (I don't know the "official" name for those).  So there she is.  Hope you like her
till next time,
janna

Friday, March 26, 2010

Position is Everything!


Is position everything?  There's something to think about huh?  I absolutely love these ladies though.  I found this old postcard at my fave. antique mall/flea market/restaurant (I have not actually eaten at the restaurant, but it looks like folks like the food:) ).
This altered tin, is just the lid of an Altoid tin.  I thought it would be fun to just use the lid, that way it can be hung up on whatever you want to hang it on.  The lids are nice too, because they have the two slats on the side, that is easy to feed ribbon through.
I tried to keep it pretty simple and elegant.  The postcard is the background image.  The flower is just a silk flower that I covered in Dictionary paper, I highlighted a bit with my Weathered Wood Distress Ink, then added a bit of color with Fired Brick Stickled for the center.  The outside of the tin is also lined in Dictionary paper.  I broke out my Mini Holiday stamps from the Tim Holtz collection, Stampers Anonymous.  I used the Postcard Stamp from this series.  I didn't worry about it all fitting on the background image, not fitting adds to it I think.  I stamped the postcard image and used Black Soot Distress Embossing Powders.  I lined the inside edge with Tattered Rose Distress Stickles, and the upper outside edge with Antique Linen Distress Stickles.  I used a small piece of lace on the upper right corner.  Now, I needed SOMETHING for the left corner, but what?  Tried several different things there, and well, they didn't work.  My husband found the little jewelry baubles, and as soon as he showed them to me I knew, that they were just what I was looking for.  The quote is from the original postcard.  I cut it out, lined it with a gold leaf pen, put a little bling at the corners and away we go!
Hope you enjoyed looking, till next time
janna

Monday, March 22, 2010

An Easter Homage to Little Georgie


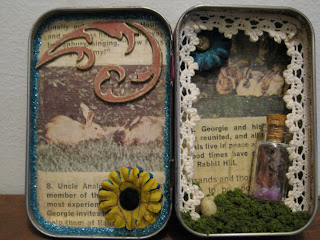
I've been wanting to do an altered Altoid tin with an Easter theme.  I have to say I had a very hard time finding that just right bunny.  I'm really not a cutesy kind of gal, so right there I lost three quarters of my options.  So, after much bunny hunting, I found it!  I was browsing through the local antique mall/flea market/restaurant..... anyway, I found an old Jack and Jill magazine from March of '67.  Inside was an article on an upcoming airing of Little Georgie of Rabbit Hill, based upon the the book Rabbit Hill.  This article had such great pictures of the real rabbit's from Rabbit Hill, that I knew I had found the makings of my altered tin.

For this tin I used grungeboard flourishes, colored with Distress inks, and lined with a gold gel pen.  On the inside edges I used Ice Stickles and Distress Stickles.  Finishing accents were made with lace, flowers, small findings, and for the grass I used a bag of underbrush for model trains.


Tuesday, March 2, 2010

Embrace Your Distress Inks


I recently received my order from Stampers Anonymous, and all I can say is, I'm in love!  I used a couple of different stamp sets form the Tim Holtz Collection, I used from the Mini Muse and Natures Moments sets for this card.
I used Distress Inks for the background along with the stamped images.  I have to admit when I started trying a couple colors of these inks, I wasn't sure about them.  Turns out I just didn't know how to use them, or harness the multitude of different looks that could be achieved.  Tim Holtz has wonderful tutorials on his web site.
For the background I used Broken China, and Weathered Wood Distress Inks.  I then used Old Paper and a bit of Perfect Pearls in my Mini Mister and lightly misted the whole card.  I din't use any particular color of Perfect Pearls, I like to take extras from other projects and mixing them all together.  The main image is from the Nature's Moments stamp set.  I inked up with Shabby Shutters and Worn Lipstick.  The sentiment is two separate stamps from the Mini Muse set.  I stamped embrace with Milled Lavender, I like this because it has more of a watermark effect.  The second part of the sentiment is stamped in Concord Grape.
I love the overall look of this card, it has spring written all over it!  Hope you enjoy!