Thursday, November 11, 2010

Peace


Tis the season.....to get my rear in gear and make some Christmas cards! Once I figured out the spacing this card went together very easily. I started out by splotching on Tumbled Glass and Broken China Distress Ink, splotches worked great as they add some texture. Once I had my desired splotching, lightly used Old Paper DI, more to blend then to add color. Now, at this point, I took my Snowflake Impressabilities template and lined up on my card stock. Using Broken China DI, I applied the ink by thumping with my ink applicator.
The snowflakes were made using the Martha Stewart Snowflake punch. Each snowflake was covered in Crystal Stickles, except for one, which was covered in Diamond Stickles. I liked using this snowflake because of the pretty design they make when staked up to make my tree.
To finish this card up, I die cut the letters for Peace and colored with a gel pen. I love how the A looks like the trunk of the Christmas tree.
Very easy, but a very fun eye catching card to make and share.

Janna

Wednesday, November 10, 2010

Time Traveler

I made this for this weeks challenge over at Simon Says Stamp and Show. This week we were asked to stamp and show using our favorite T!m Holtz stamp. Asking someone to pick their favorite?!? That is a tall order. The stamp I chose is part of the Classic Collage set. Looking at this stamp, makes me want to travel back in time, to visit these hotels, and, collect luggage stickers!

Janna

Supplies
Timeworks Mask
Classic Collage set
T!m Holtz Visual Artistry Clear Stamp collection
Grungeboard Flourish
Watch Parts
Faded Jeans
Broken China
Tumbled Glass
Fired Brick
Mustard Seed
shabby Shutters
Dusty Concord
Frayed Burlap
Brushed Corduroy
Colored Pencils
Stream AI
Copper Mixative AI

Friday, November 5, 2010

Harvesting Dreams


I made this for this weeks challenge over at Simon Say Stamp and Show blog. This week the challenge was to stamp and show something shabby. How fun! I chose to shabbify an old postcard I found at the antique mall/flea market/cafe.
I wanted the focus to be on the lady in the postcard, so I framed around her. At the top of the card, I used dictionary paper and then design paper on top of that. I sanded everything and inked with Shabby Shutter, Broken China and Vintage Photo Distress Ink. The flourish is stamped in Faded Jeans DI, and is from Tim Holtz Mini Holiday set. Along the bottom I used Tissue tape inked with Worn Lipstick, and Vintage Photo DI. Finally, I embellished with the ticket and memo pin, both from Tim. The ribbon and little embroidered flowers were found by a friend of mine at an estate sale, beautiful find!
So, there she is, in all her shabbiness.  Love it!  Had a lot of fun, maybe I'll be able to get one more done in time.....
Here is a picture of the original postcard.

Janna

Friday, October 29, 2010

Frightfully Alice


I made this for this weeks challenge over at Simon Says Stamp and Show.  The challenge this week was to stamp and show something spookay.  Fr this challenge I used paper form Graphic 45 Halloween in Wonderland.  Along with the beautiful paper, I had to get T!m in, so I used his retro halloween skelly, and a couple of masks. 


For the frame I painted it black, and then embellished with puff paint.  I confess, I LOVE using puff paint (dimensional fabric paint) on different projects, it adds a cool dimension and feel to things.  The flower is grungepaper and made using the Tattered Floral Alterations die.  I accented the tips of flower with puff paint also :)  I tried to distress the little bottle with black Stayz On.  Maybe Alice is wondering what the potion she just drank will do?

Down here at the bottom I used a watch crystal, I used this not only because it fit with the story, BUT, it accentuated the wonderland dictionary entry. For the dictionary page I splotched around some Dusty Concord, and Spiced Marmalade DI, then placed the large mask and went over with Black Soot, I then placed the second, smaller mask and went over with Peeled Paint.  Finally, T!m's skelly pops up with a sign , of all things accusing the queen!

Thank you for stopping by, hope everyone has  a safe and haunting halloween!

Janna

Monday, October 25, 2010

Fall......

Fall is in the air!  Finally, seems like it's been a long time coming this year.  This is my fall inspired card, clean and simple.  I used Tim Holtz Distress Ink in Fired Brick, and Mustard Seed for the background.  Once I had my background inked, I laid my Floral Impressabilities templates directly on the card front and inked over in DI Walnut Stain.
The Flower was made using Tim Holtz Tattered Floral die.  I inked all the petals first with Spiced Marmalade DI, then I used Fired Brick DI to highlight he petals.  I did do some additional embossing to alternate layers.  The center of the flower is a brad covered in black flocking.  A little ribbon and some feathers and voila!  My interpretation of fall.

Wednesday, September 15, 2010

Days in Life

Keeping a good calendar is an important thing.  I have tried using my phone, using various calendar applications on my computer, then synchronizing between my phone and computer, ugh what a pain!  So I went out and got a date book.  Works great!  But, well, very blah to look at.  So I decorated it up a bit.
I covered the book in suede, and went to town on it.  All stamps, except for the dragonfly, and some of the embellishments are Tim Holtz.  My favorite finding to date is on here, the LL3, know what it is?  It's an elevator button (very cool), I found two of them in a free box at a yard sale.  I was so excited to find them, after all I am the only one I know who has ever found elevator buttons at a yard sale.  Most everything was stamped in Staz-On, I then accented with glitter pens.  I accented the wings of the dragonfly in Perfect Pearls, then made the bead body.  You can't see it, but, I accented the sides of the Scrabble tiles with Tim's Tissue Tape.
I'll do some decorating on the back, and may even add more to the front, who knows.  Once this book is done being used as a date book, I'm going to start using it for techniques samples, I see 12 Tags of Christmas going in here.... all sorts of stuff!

Thanks for visiting, and have a wonderful day.
Janna

Friday, July 16, 2010

Butterflies and Roses and Lace Oh My!

So this is my first real try at doing an over the top girly card.  This also happens to be my first attempt at a side step card.  I tried to think outside the box with the butterflies.  I stamped and colored each butterfly, then accented each with Perfect Pearls in a variety of colors.  Finally I finished the bodies with bead-work.  I didn't accent the roses a whole lot (the butterflies steal the show), I built each up on several layers of tissue paper, I colored each layer using Distress Inks applied with one of my favorite tools, Fantastix.  Fantastix are great coloring tools, they come in either a brush or bullet tip, I love how easy they are to use.
I found the tutorial for the side step card on Splitcoast.

Friday, July 2, 2010

It's an altered world after all....

I love making altered tins.  I like the idea of taking a corner of my minds eye, and tucking it into a little tin box, to share with someone special.  I recently made this tin for a very special someone's 18th birthday.

I knew I wanted to try something different with this tin, in that I wanted to use two tins.  I toyed with the idea of attaching the tins to each other with hinges, but in the end I glued them back to back instead.
This is a picture of the front lid.  I used a page out of a 1952 Sears catalog for my dp.  I inked the paper using Tim Holtz Distress Inks.  I then used a frame stamp from the Tim Holtz Visual Artistry collection and archival ink to distress things a bit.  I then distressed the Scrabble letters by sanding them, and inking with Distress Ink, then I used the same frame stamp on the Scrabble letters.

 This is the inside of the first tin.  I used the same catalog, but did not do as much distressing of the paper.  I love using old keys on things, and was very excited to find a cool old one with a star.  For the miniature domino, I used Tim Holtz Adirondack Alcohol inks.  For the glass bottle I attached little watch gears to the inside and the outside.  Stamps and ink are, you guessed it, Tim Holtz!  I love the nostalgia that his images bring.


This is probably my favorite part of the tin.  Such cool findings were placed in this one.  the lens in the lower right, red and black dial and the coil at the top middle are all from an old movie camera.  See the LL2?  Know what it is?  It's an elevator button.  I love it!  One of those once in a lifetime finds.  Actually came across it and one other in a free box at a garage sale, score!  The clock stamp is Tim, but the hula popper (fishing lure) stamp is from Hobby Lobby.  For the popper I used colored pencils and mineral spirits, then I shot it with clear coat.  I accented the eye with Glossy Accents.

So I am a picture short.  I'm opting to not post a picture of the back lid.  While it is very cool, it contains personal information, sorry.  I hope you have enjoyed looking, as much as I have enjoyed sharing.  Happy day!

Thursday, June 17, 2010

Long time no blog....

Wow, lie got a bit hectic there for a while.  So not a whole lot of time to blog.  Have been working on a of projects though.  A while back I signed up to participate in my first EVER swap.  This swap was through Stampers Anonymous, and I have to say I'm hooked.  What a fun bunch of ladies.  I can't wait to get back everyones pages.  So here is a look at mine.

Soooo, Stampers Anonymous swap, must mean SA stamps.  All I have for SA stamps right now are Tim's.  While I love working with his stamps, I would like to expand to some of the other artist.  
I tried to think outside of the box for this, but I may have stepped on or even crushed it instead.  This page is actually made up of four layers.  I used watercolor paper as my base.  The next two pages are from on old Botany book.  I pages that I though would be interesting and inked them up very loosely.  Meaning, no full coverage, very grungy.  Each side of those two pages were inked with a different color.  Now the top page is actually a piece of tin foil.  On the inside  side of the foil (shiny side) I used alcohol inks, and created a marble effect.  On the outside side (non-shiny side) I used my paint daubers.  I used Snow Cap first, creating lines across my page, then I followed with Espresso, Lettuce, and finally Pitch Black.  I was going for a very grungy feel.  
At this point I set aside all four of those pieces.  Time to break out the stamps.  I tried to be random in the type of stamps I chose.  I stamped, inked, and cut out each piece.  While choosing my inks for stamping and the background of each image, I tried to contrast my foil, with bright vibrant colors.
Now the fun part......(actually perhaps fun is the wrong word, but a very cool effect)  Taking the two sheets of text book paper, and the piece of foil and glue them all together along the out side edge (I used my glue runner).  At this point I cut a small slit in the middle of this stack.  Then, flipping the stack over, so you are looking at the back of your last text book page, carefully poke your finger through the cut you made.  Carefully tearing a whole that will fit your largest stamped image through.  In this case it was the numbers stamp, you don't want to stick this image all the way through your tear, as we are going for a look of the art bursting out.  Once you have you tear made, flip you sandwich over and start gluing back your layers.  I glued each layer of tears separately to help give dimension.
Once all parts of the tear are glued back and your largest image is in place, I glued my sandwich down to my base piece of watercolor paper.  Now, simply place the rest of your stamped image randomly to create a neat collage.  Some of the images I used just my glue runner, while others I used foam glue squares, again to add dimension.  
At this point it's time to clean things up a bit.  I opted to frame my whole image in black ribbon. I stapled down the corners, using my Tiny Attacher.
This was a really fun project, and I hope the other participants enjoy this page as much as I enjoyed making it.


Sunday, April 25, 2010


I can't believe I went this long without a die cutting machine.  I have really enjoyed playing with my Nestabilties dies from Spellbinders.

Supply list for this card:
Cuttlebug embossing folder- Bird Call.
Spellbinders Nestabilities dies- Deckled Edge Classic Oval LG
*I used the largest two dies for the image and the smallest for the sentiment.
Distress Ink- Tattered Rose, and Brushed Corduroy
1/2" Cotton Ribbon

For this card start out cutting out your three deckled ovals using your die cutting machine.  Set them aside for now, we'll come back to them in a minute.

Take a piece of cardstock 4"x5.5".  Emboss this with your embossing folder.  You will now emboss both ovals, watching your placement, so they will nest correctly on your large image.

For my sentiment I printed it up from my computer.  In order to get the placement of the die correct I held my die and piece of paper up tot the light.  When I had it placed where i wanted I used a piece of painters tape to hold it in place for sandwiching.

Using your ink blending tool, and Distress Ink in Tattered Rose go over all your embossed images. I went over my image pretty heavy, highlighting the embossing, but also adding color to the whole piece.  Finally accent edges with Distress in Brushed Corduroy.

Now it's time to put all your pieces together.  I found it easiest to glue in this order:

Main image to front of card blank (same size as image).
Oval to oval.
Oval to main image.
Ribbon
Sentiment

Very cute, very clean card.  It would make any mother proud!

Till net time....

Janna

Sunday, March 28, 2010


So I wanted to make an ATC, with our lady here.  I found her on an old postcard, and thought she looked very fashionable.  
So, to start with I trimmed the picture down our of the postcard.  I had to trim a little more for her to fit on an ATC, but you can't tell.  The roses were a labor of love.  To start off I stamped both the roses and the butterfly for positioning, then I stamped the butterfly again, in order to make a mask.  I stamped the butterfly on the hymnal paper first, then applied the mask, and then stamped the roses.  I colored everything using colored pencils and mineral spirits.  Now here is where the fun starts.  I stamped the butterfly and rose again, and colored both of them again with the same technique.  I then cut, accented with Perfect Pearls, and glued into place each individual petal, and the butterfly.  While an intensive technique it adds so much dimension.  The spots where there is not a dimensional petal, it is because that is the part of the petal before it opens outward.
Finally I accented the edge of the photo with Antique Linen, and Tattered Rose Distress Stickles.  I accented the top with some lace, and then bead accents.  I finished with the little light catching embellishment, (I don't know the "official" name for those).  So there she is.  Hope you like her
till next time,
janna

Friday, March 26, 2010

Position is Everything!


Is position everything?  There's something to think about huh?  I absolutely love these ladies though.  I found this old postcard at my fave. antique mall/flea market/restaurant (I have not actually eaten at the restaurant, but it looks like folks like the food:) ).
This altered tin, is just the lid of an Altoid tin.  I thought it would be fun to just use the lid, that way it can be hung up on whatever you want to hang it on.  The lids are nice too, because they have the two slats on the side, that is easy to feed ribbon through.
I tried to keep it pretty simple and elegant.  The postcard is the background image.  The flower is just a silk flower that I covered in Dictionary paper, I highlighted a bit with my Weathered Wood Distress Ink, then added a bit of color with Fired Brick Stickled for the center.  The outside of the tin is also lined in Dictionary paper.  I broke out my Mini Holiday stamps from the Tim Holtz collection, Stampers Anonymous.  I used the Postcard Stamp from this series.  I didn't worry about it all fitting on the background image, not fitting adds to it I think.  I stamped the postcard image and used Black Soot Distress Embossing Powders.  I lined the inside edge with Tattered Rose Distress Stickles, and the upper outside edge with Antique Linen Distress Stickles.  I used a small piece of lace on the upper right corner.  Now, I needed SOMETHING for the left corner, but what?  Tried several different things there, and well, they didn't work.  My husband found the little jewelry baubles, and as soon as he showed them to me I knew, that they were just what I was looking for.  The quote is from the original postcard.  I cut it out, lined it with a gold leaf pen, put a little bling at the corners and away we go!
Hope you enjoyed looking, till next time
janna

Monday, March 22, 2010

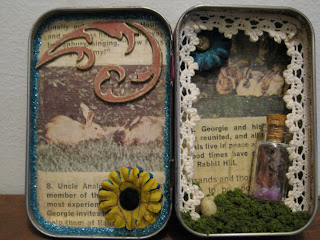
An Easter Homage to Little Georgie


I've been wanting to do an altered Altoid tin with an Easter theme.  I have to say I had a very hard time finding that just right bunny.  I'm really not a cutesy kind of gal, so right there I lost three quarters of my options.  So, after much bunny hunting, I found it!  I was browsing through the local antique mall/flea market/restaurant..... anyway, I found an old Jack and Jill magazine from March of '67.  Inside was an article on an upcoming airing of Little Georgie of Rabbit Hill, based upon the the book Rabbit Hill.  This article had such great pictures of the real rabbit's from Rabbit Hill, that I knew I had found the makings of my altered tin.

For this tin I used grungeboard flourishes, colored with Distress inks, and lined with a gold gel pen.  On the inside edges I used Ice Stickles and Distress Stickles.  Finishing accents were made with lace, flowers, small findings, and for the grass I used a bag of underbrush for model trains.


Tuesday, March 2, 2010

Embrace Your Distress Inks


I recently received my order from Stampers Anonymous, and all I can say is, I'm in love!  I used a couple of different stamp sets form the Tim Holtz Collection, I used from the Mini Muse and Natures Moments sets for this card.
I used Distress Inks for the background along with the stamped images.  I have to admit when I started trying a couple colors of these inks, I wasn't sure about them.  Turns out I just didn't know how to use them, or harness the multitude of different looks that could be achieved.  Tim Holtz has wonderful tutorials on his web site.
For the background I used Broken China, and Weathered Wood Distress Inks.  I then used Old Paper and a bit of Perfect Pearls in my Mini Mister and lightly misted the whole card.  I din't use any particular color of Perfect Pearls, I like to take extras from other projects and mixing them all together.  The main image is from the Nature's Moments stamp set.  I inked up with Shabby Shutters and Worn Lipstick.  The sentiment is two separate stamps from the Mini Muse set.  I stamped embrace with Milled Lavender, I like this because it has more of a watermark effect.  The second part of the sentiment is stamped in Concord Grape.
I love the overall look of this card, it has spring written all over it!  Hope you enjoy!

Friday, February 19, 2010

St. Patrick's Day ATC


This is an art card I made for St. Patty's day. I started this off with a dictionary page.  I thought it was fitting to use the "Irish" entries :)
Once the dictionary page is on, I inked over with Tim Holtz Distress Inks.
The girl is form some German scrap I found at an antique mall, isn't she fabulous.  She was very shiny, so I took some sandpaper and grunged her up a bit.  
The chip board was inked, and then I used Crackle Accents, to give a nice cracked finish. Then I carried the flourish up a little farther by using a stencil and Perfect Pearls.
The roses I just added some green Perfect Pearls, to accentuate the Irish them.
Finally I used a fragment to accent the Irish entries on the background.


Supplies:
Distress Inks-
Frayed Burlap
Peeled Paint
Shabby Shutters


German Scrap
Chip Board flourish
Paper Roses
Crackle Accents form Ranger
Forever Green Perfect Pearls

Getting my feet wet....

There's a first time for everything, this just happens to be my first time with a blog. All sorts of questions running through my head, will anybody read it? Will anybody follow it, comment? Here's to giving it a shot and jumping in.